Modern heat pumps are incredibly efficient and can be used to heat and cool your home, however there's still the matter of controlling them precisely to how your would want your house. With it being more decrentalized especially with minisplits, it's a bit more tricky to "nest" them. I wanted to have a somewhat automated climate controller that meant automatic switch on when the temperature is too low and switch off when the temperature is too high as well as using an external temperature sensor to control the temperature.
There's this amazing project called https://github.com/echavet/MitsubishiCN105ESPHome which has reverse engineered the communication protocol of the heat pump and has a library to control. Paired with esphome, it's extremly simple to get it onboarded to homeassistant. However the project is old and more modern implementations use a esp32 and this talks about a simple installation I made.
BOM
| Component | Description | Price (USD) |
|---|---|---|
| ESP32-WROOM-32 | Generic one of amazon, this one is 30 pins, but anything cheap works | 22/5 = 4.4 |
| 3.3-5V level shifter | IIC I2C Logic Level Converter Bi-Directional 3.3V-5V Shifter Module | 7.49/10 = 0.75 |
| Jumper cables | 40 PCS 20 CM (8 inch) Breadboard Jumper Wires Wire Length Optional Dupont Cable Assorted Kit Female to Female Multicolored Ribbon Cables | 3.99 |
| CN1005 Adapter Cables | PAP-04V-S PAP-05V-S 20/30cm PA2.0mm PAP2.0 to Dupont 1P Male/Female Wire Position Rectangular Housing Connector 0.079" (2.00mm) | 5.22 |
Total = 14.36
Compared to the official cloud solution, the Kumo Cloud thermostats which are about 344$ per indoor head, this is a fraction of the cost.
Wiring
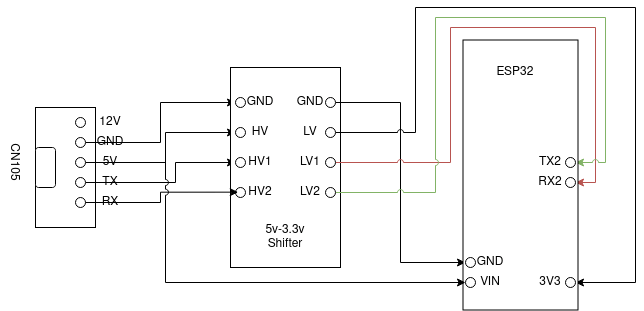
Level Shifter
Most projects ignore the level shifter, the CN105 protocol has been reverse engineered to be running on 5V and not the 3.3V which the ESP32 expects on the UART ports. While most ESP32s are somewhat tolerant of this, it's just better to have a level shifter, especially when the possibility of it knocking out the control board of the heat pump is a possibility. Thanks un-named W manager for the help with this.
ESP32
There's a lot of versions out of there, to be honest it doesn't really mattcher much, I just got the 2 core version just in case. Mine does have an annoying red LED on it, which is spliced directly into the power so the only way to turn it off is to remove the SMD diode. I left it on since shoving it into the heat pump doesn't cause that much of a light bleed and also a good way to tell if it's working or not.
I reccomend a layer of glue gun on the dupont cables to make sure they don't come loose and heat shrink the whole thing if you want to be extra careful.
ESPHome
The ESPHome configuration is pretty simple, follwing the instructions in the MitsubishiCN105ESPHome repo.
esp32:
  board: denky32
  framework:
    type:  esp-idf

climate:
  - platform: cn105
    id: hp
    name: "Bedroom heat pump"
    icon: mdi:heat-pump
    visual:
      min_temperature: 16
      max_temperature: 31
      temperature_step:
        target_temperature: 1
        current_temperature: 0.5
    # Fahrenheit compatibility mode - uses Mitsubishi's "custom" unit conversions, set to
    # "true" for better support of Fahrenheit units in HomeAssistant
    fahrenheit_compatibility: false
    # Timeout and communication settings
    remote_temperature_timeout: 30min
    update_interval: 30s
    debounce_delay: 100ms
    # Various optional sensors, not all sensors are supported by all heatpumps
    compressor_frequency_sensor:
      name: Compressor Frequency
      entity_category: diagnostic
      disabled_by_default: false
    outside_air_temperature_sensor:
      name: Outside Air Temp
      disabled_by_default: false
    vertical_vane_select:
      name: Vertical Vane
      disabled_by_default: false
    horizontal_vane_select:
      name: Horizontal Vane
      disabled_by_default: true
    isee_sensor:
      name: ISEE Sensor
      disabled_by_default: true
    stage_sensor:
      name: Stage
      # use_as_operating_fallback: false     # set to true if your unit doesn't provide activity indicator
      entity_category: diagnostic
      disabled_by_default: true
    sub_mode_sensor:
      name: Sub Mode
      entity_category: diagnostic
      disabled_by_default: false
    auto_sub_mode_sensor:
      name: Auto Sub Mode
      entity_category: diagnostic
      disabled_by_default: false
    input_power_sensor:
      name: Input Power
      disabled_by_default: false
    kwh_sensor:
      name: Energy Usage
      disabled_by_default: false
    runtime_hours_sensor:
      name: Runtime Hours
      entity_category: diagnostic
      disabled_by_default: false
Tracking down the esp32 board is a bit annoying, especially if you buy a generic cheap one. Try and match the specs with one of the boards at platformio. I was surprised that the esphome tool mDNS discovery just works TM. It's on a separate VLAN so I had to add cross talk exceptions, but mDNS just worked, (security issues much?)
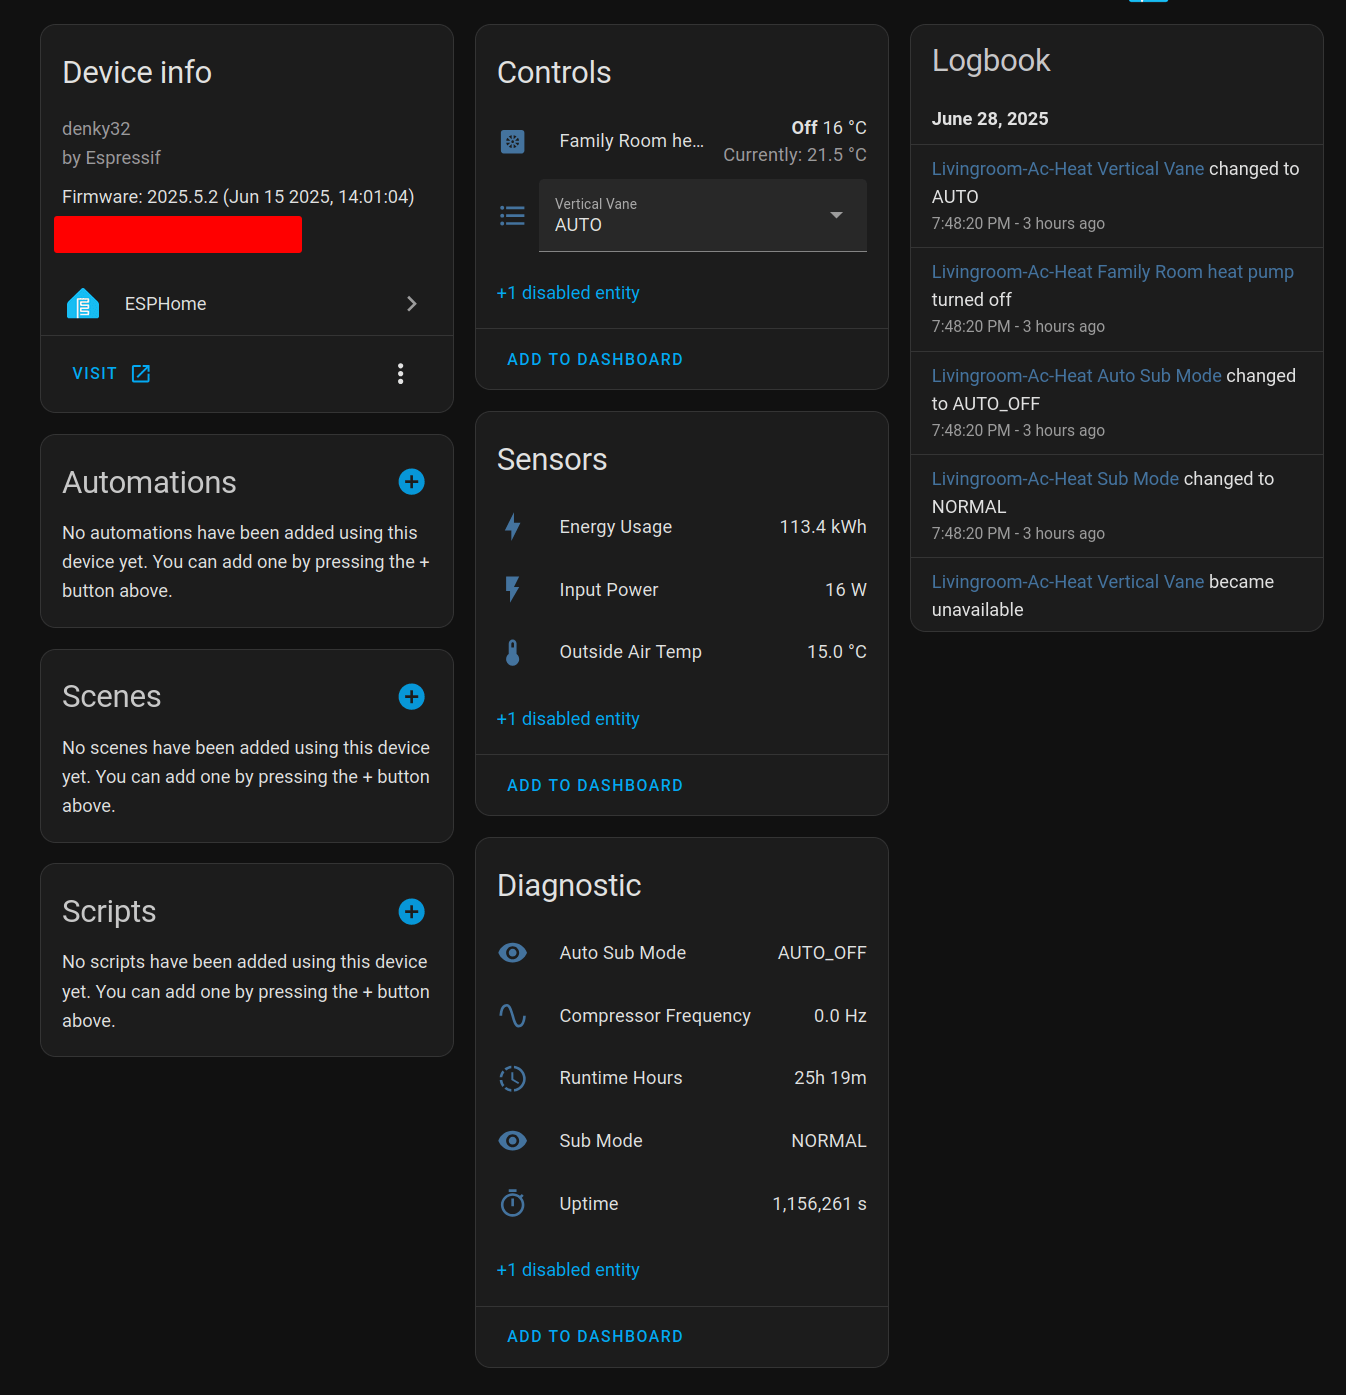
Energy tracking in Home Assistant
I have a 3 head unit and the first head that I connected to ESP32 for some reason tracks the entire power usage of the outdoor unit. While it's a bit annoying, this is not too bad since the outdoor unit is the only one that has a power meter. Make sure you turn it on in the configuration.